Or try one of the following: 詹姆斯.com, adult swim, Afterdawn, Ajaxian, Andy Budd, Ask a Ninja, AtomEnabled.org, BBC News, BBC Arabic, BBC China, BBC Russia, Brent Simmons, Channel Frederator, CNN, Digg, Diggnation, Flickr, Google News, Google Video, Harvard Law, Hebrew Language, InfoWorld, iTunes, Japanese Language, Korean Language, mir.aculo.us, Movie Trailers, Newspond, Nick Bradbury, OK/Cancel, OS News, Phil Ringnalda, Photoshop Videocast, reddit, Romanian Language, Russian Language, Ryan Parman, Traditional Chinese Language, Technorati, Tim Bray, TUAW, TVgasm, UNEASYsilence, Web 2.0 Show, Windows Vista Blog, XKCD, Yahoo! News, You Tube, Zeldman
Home Design Now
Home Design, Decor and RemodelingGuest Bathroom Ideas: Decor, Design and More 22 Apr 2024, 2:12 pm
The bathroom, serving as the starting and ending point of each day for most people, is one of the most important rooms in a home. It offers a space to decompress, find freedom, and, for some, even sparks inspiration. Consequently, when guests visit your home and stay overnight or for an extended period, they too need that comfortable and inviting space. If you want guests to feel welcome and refreshed for a comfortable stay, it is important to design your guest bathroom effectively. Make sure to add some decor and have all the necessary supplies readily available.
Tips To Design Your New Guest Bathroom
Your first guest bathroom design decisions will be what fixtures to put in the room and where to put them. Following that, you’ll have to consider whether to do a freestanding sink or what kind of cabinets you want underneath it. From there, decide between custom construction or RTA cabinets.
Next, move on to the flooring. If you want a spa-like experience, stone tile is beautiful and functional. To balance budget concerns while still maintaining a touch of elegance, you can incorporate some stone into your design as a contrast to porcelain. Stonecreek SPC click flooring is another popular and long-lasting choice.
As you move on to consider the aesthetics, keep plenty of white and off-white to make the room feel more spacious. However, contrast this with warmer elements. Shades of gray-beige or slightly subdued grays can ground a space well.
As you envision your guest bathroom design, consider how many instances there are of rugged, glossy surfaces. Instill a human touch with tactile textures, such as woven boxes or baskets, which also add functionality. Wood elements can help bring some natural energy into an otherwise sterile space, and you can do this with the help of small accessories or by adding an accent tool to the vanity and shelving. Just be sure you pick a piece that is already well sealed or seal it yourself since moisture damage is always a bathroom risk.
Ways To Decorate the Bathroom To Be Welcoming
After you’ve finished shopping for wholesale bathroom vanities and before you start purchasing specific products to stock the guest bathroom, you need to decorate it. Privacy shades are an excellent place to start. Natural light is great for most bathrooms, but guests might want privacy in an unfamiliar neighborhood.
Next, simplify their life by putting a tray out where they can easily store their toiletries for immediate access. A decorative stool can help visiting kids who might have trouble reaching the sink or mirror.
Greenery adds a breath of life to a refreshing space. Fresh greenery lets guests know you’ve recently checked on the room and ensures it’s ready for visitors. Artificial plants offer a permanent solution, especially for a windowless bathroom. A lack of natural light doesn’t have to kill the decor, though, as you can embrace darker colors with the wallpaper. Floral wallpaper usually works in most bathrooms, but think about scaling the blooms to be proportionate to the size of the room. If you trust your visitors with candles, include several scents and a box of matches for their enjoyment.
Bathroom Products To Keep For Your Guests
When thinking about products for your guest bathroom, consider how to treat your guests with luxury and comfort in addition to practical things. Hand soap, toilet paper and towels are prominent products to stock up on. Still, you might want to think of things guests might need that they might not feel comfortable asking you for, especially if they wind up needing them when you’ve already gone to bed. Make sure there’s a plunger available, over-the-counter painkillers, feminine hygiene products and even extra rolls of toilet paper. Cotton balls and swabs, a trash can, a bath mat and a basic first-aid kit are more items that guests can use for a comfortable visit.
Once you ensure your guest bathroom is stocked with enough necessities, you can start thinking about products that make the space more comfortable and even add a touch of luxury. Many people pack toiletries when they travel, but providing more options than typical travel varieties can give your bathroom a bit of a boutique hotel ambiance. Toiletries can be a welcome help to anyone who flies and has to keep certain things under FAA limits in their carry-on bag.
Your guests might be familiar with bidets if they have traveled to Europe, and they’re also gaining popularity in other parts of the world. Those who use them consider them very sanitary and pleasant options. You should even consider updating the faucets and showerheads of your guest bathroom to save water while still providing maximum water pressure. As a final courtesy, ensure they can lock the bathroom door so other guests don’t get interrupted accidentally.
Make and Keep an Inviting Home
The process of getting ready for houseguests might not be a part of your routine, but it is an opportunity to host friends and family visiting from out of town. Whether it’s the holidays or just a seasonal vacation, having them close by makes it significantly easier to spend quality time with those who have traveled to see you.
Now You’re Ready!
You’ll usually be inclined to prepare the guest bedroom and ensure the rest of your home is clean and ready to make a good impression. However, don’t forget the guest bathroom visitors might use. The right design and decor will create a welcoming space that your guests will find refreshing, but make sure you stock it with things they need right before they show up.
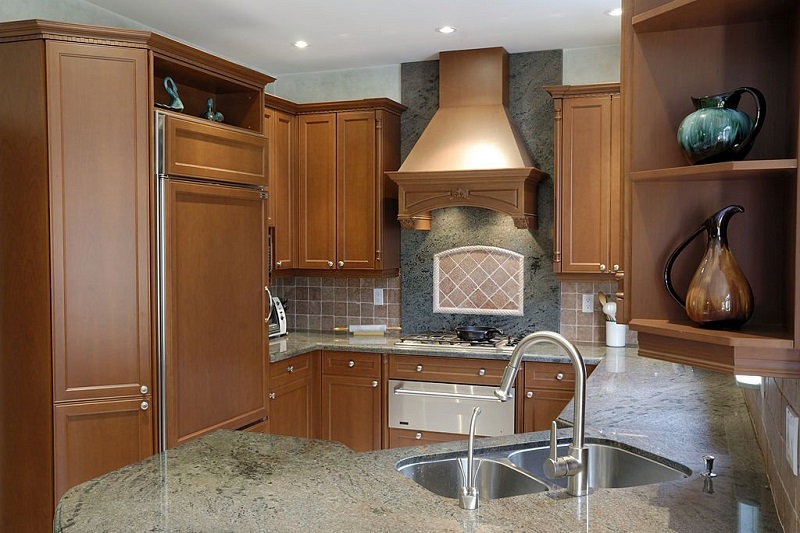
The Various Pros and Cons of Single Bowl Kitchen Sink 4 Apr 2024, 11:51 pm
It goes without saying that the kitchen is one of the most important rooms in anyone’s household. It is a place where much time is spent and cooking and washing the dishes. Hence, sinks become an integral part of kitchens. Without the sinks, it would not be possible to wash the dishes and dry them. Thus, it is important that a homeowner chooses the sink to be used carefully. There are various types of sinks available in the market which are available in a different size, style, and material, but if you are looking for a compact and effective solution, then going ahead with a single bowl kitchen sink is a good choice. It is a kind of sink that has a single large basin without any divider. These kinds of sinks are especially good for those who are running low in space. single bowl kitchen sink takes up lesser space and yet provides similarly effective. However, there are both pros and cons of this type of sink and the selection ultimately depends on the homeowner’s need.
Kitchen Sink
Pros of A Single Bowl Kitchen Sink:
- The primary benefit of a single bowl kitchen sink is that it can get fit into small places. So, if you are facing space restriction issues, then probably trying out the single bowl kitchen sink is a good choice for your kitchen.
- Given the fact that a single bowl kitchen sink does not have any divider, it naturally gives more space to wash larger utensils seamlessly. You will be able to wash a frying pan or the likewise utensils on a single bowl sink more easily than in a sink with a divider.
- Aesthetically appealing with a simplistic design. Yes, that makes another addition to the list of advantages of having a single bowl sink. Since its compact, and doesn’t have division, the look of the sink is eye-pleasing especially when they are used in small kitchens.
- Since you don’t get a chance to store the used utensils in the sink because of the lack of division, you need to clean the dishes before it starts piling up in the sink. Thus, it also makes sure that your kitchen looks spick and spank.
Kitchen Sink
Buying A Single Bowl Kitchen Sink:
If you have decided that a single bowl sink will fit your purposes greatly, then you would have to think of buying it from an authentic place. You will find a lot of shops selling the kind of sink you want. However, you cannot randomly choose any shop and buy from there. You will have to do thorough research before you select any shop and then only you can proceed.
Here Is Something That You Need to Follow:
- Make sure to look up the shop you have selected online to get its customer reviews and ratings. The customer reviews and ratings will help you to understand the quality of the services of the company.
- Assess the space of your kitchen before buying the sinks. Yes, even the single bowl sinks are available in different sizes, so you must choose the sink which fits well in the available space.
- Look for the material of the sink, you have the option of stone, ceramic, stainless steel as the material for your kitchen. The pricing for the same may vary as per the quality of the sink. However, stainless steel is considered to be the best material.
Wrapping It Up: Lastly, given the fact that you will be using the kitchen, it is up to you to make a decision about the kind of sink you want. Take the measurements of your kitchen properly before buying any sink. You can explore options both online and offline stores, match your requirements and budget before buying the same.
Author Bio:
I am Adam Wilson, a qualified blogger. Here you can see my skills which give you small ideas on understanding all the concepts with different themes. I love to write a blog on different topics, like Health, Fitness, Home Improvement, Kitchen, Furniture, Gardening, Automotive, etc.
How to Decorate a Bathroom with Pantone’s Color of the Year 27 Mar 2024, 1:39 pm
These are the perfect adjectives to describe Peach Fuzz, the Pantone 2024 Color of the Year. It’s a just-right shade that walks the line between orange and pink, bold and muted, modern and vintage. Pantone describes Peach Fuzz as a color meant for “enjoying a moment of stillness and the feeling of sanctuary this creates,” making this shade an ideal choice for your bathroom.
Create a comforting ambiance when you choose this variation of peach. Depending on the saturation and brightness levels, there are many shades to choose from when it comes to selecting a bathroom color—and just as many ways to decorate with it. Learn more about how to make your bathroom feel just peachy.
Peach Fuzz Decorating Tips
Peach Fuzz and its different shade options are versatile colors in any interior design palette. Here are some ways you can deploy it to best effect in your spaces:
- Use it with another neutral color. A soft, light peach works well with other similar tones, like cream, white, or beige, to create an airy, spacious effect. It acts like a neutral but with a lovely spin on the typical off-white or tan.
- Make the perfect match with blue and peach. Blue and orange are opposites on the color wheel, which makes them complementary shades. Think of a turquoise blue against a darker, almost terracotta peach or navy paired with a peach that has a subtle orange undertone. Usually, one color will be the dominant shade in your design, with the other serving as a secondary color.
- Take inspiration from nature. Picture a tree in all its glory, with peachy pops of fruit nestled between lush green leaves. Now, translate this same color combination into your home design. It can be vibrant or mellow, depending on the saturation of your colors. Once you’ve picked your peach color, see how it looks with different greens, from olive to emerald, to find the ideal shade.
- Add drama with the interplay between dark and light. Deep, dark colors in furniture or paint (yes, even black) add a rich, sophisticated contrast to light, peachy colors.
- Work with wood tones. Rich, natural wood can complement lighter tones like peach for a sumptuous look that creates a space with great warmth.
- Expand your idea of what peach is. Peach Fuzz, while beautiful, is just one spot on the peach spectrum. Explore all the options, from nude to neon, and you’re sure to find the color that’s just right for your home.
Bring Peach Into Your Bathroom
Now that you have some ideas for incorporating peach into your home design aesthetic, it’s time to see how this soothing color can be used in your bathroom. Peach is a great fit in this space; it creates a calming environment as well as a flattering glow, which is always a bonus when you’re getting ready in the morning. Here are some design tips to give you inspiration:
Peach Walls, Wood Vanity
The warm tones of a light wood vanity against soft peach walls create a serene, spa-like atmosphere with a blend of neutral-style shades. You could also go in the opposite direction, where a vanity in a dark paint color or wood stain creates an aura of grown-up glam.
Peach Tiles
This isn’t your grandma’s bathroom. Instead of the almost-tan peach found in retro bathrooms, choose a lighter, brighter pinky peach for a more modern update. For a fresh look, use subway tiles or glass mosaic tiles in this shade for your shower or walls.
Peach Textiles
If a bathroom remodel isn’t on the horizon (or in your budget), you can still transform your space with the addition of new rugs, towels, and shower curtains. You’ll want to find a peach that works with the colors you already have in your bathroom, so get fabric swatches whenever possible to find a good match. And don’t limit yourself to solids; geometric patterns, stripes, florals, and other prints offer plenty of design inspiration.
Peach Counters and Sinks
Of course, you can paint your walls peach. But why not switch things up and paint your walls white or green to showcase a peach pedestal sink or a terracotta countertop on your vanity? This unexpected take on peach draws the eye and offers something different in bathroom design.
Peach and Gold
Naturally, a warm color and a warm metal harmonize wonderfully together. Incorporate gold tones in your peach bathroom with your sink faucet, fixtures, wall mirrors, and cabinet and drawer pulls.
Peach Accents
It’s easy to add peach as a secondary or tertiary color to your existing bathroom palette. Bring in peach-hued accessories such as a soap dish or jewelry box, hang a piece of art with that shade, or even paint the inside of your medicine cabinet.
Peach and Nature-Inspired Decor
If you’ve chosen a soft color like Peach Fuzz for your bathroom, emphasize its earthy warmth with natural elements, such as green indoor plants, marble counters, stone-style flooring, and woven baskets and hampers.
Peach Fuzz may be the color of 2024, but when you use it as part of a well-thought-out bathroom design, it’s a color you’ll enjoy for many years to come.
The Ultimate Guide to Water Heater Maintenance: Ensuring Efficiency and Longevity 22 Mar 2024, 12:11 pm
Water heaters play a pivotal role in the comfort and functionality of our homes, heating water for showers, laundry, and kitchen use. However, like any home appliance, they require regular maintenance to operate efficiently. Neglecting this essential upkeep can lead to higher utility bills, inconsistent water temperatures, and even premature failure of the unit, necessitating costly replacements. This guide aims to empower homeowners with knowledge and practical steps for maintaining their water heaters, ensuring reliable hot water flow, and extending the lifespan of their units.

Understanding Your Water Heater
Different types of water heaters—tankless, storage tank, gas-powered, and electric—each have unique maintenance requirements:
- Tankless Water Heaters are known for their efficiency and longevity but require descaling to remove mineral buildup.
- Storage Tank Water Heaters, the most common type, accumulate sediment that needs to be flushed regularly.
- Gas Water Heaters demand checks on gas lines and ventilation for safety.
- Electric Water Heaters require element checks to ensure they are heating efficiently.
Understanding the specific maintenance needs of your water heater type is crucial for effective upkeep.
Signs Your Water Heater Needs Maintenance
Be on the lookout for:
- Inconsistent Water Temperatures: If your shower fluctuates between hot and cold without adjusting the dial, your water heater may need attention.
- Reduced Hot Water Supply: Running out of hot water faster than usual can indicate sediment buildup, reducing tank capacity.
- Discolored Water: Rusty or murky water suggests corrosion inside the tank or pipes.
- Unusual Noises: Popping or rumbling noises can indicate sediment heating and exploding at the bottom of the tank.
- Visible Leaks or Corrosion: Water pooling around the heater or visible rust on the tank warrants immediate inspection.
Routine Maintenance Tasks
- Inspecting the Anode Rod: The anode rod protects the tank from corrosion. Annually check and replace it if it is more than 50% corroded to prevent tank rust.
- Draining and Flushing the Tank: Flush out sediment from the tank at least once a year. This process involves turning off the power or gas, connecting a hose to the drain valve, and letting the water run until clear.
- Testing the Temperature and Pressure Relief Valve: This valve releases pressure if it gets too high. Lift the test lever; if water doesn’t flow freely, the valve needs replacing.
- Checking the Thermostat and Temperature Setting: An optimal setting for both efficiency and comfort is around 120°F. Adjust as necessary to prevent scalding and conserve energy.
- Inspecting for Leaks and Corrosion: Regularly visually inspect your unit for any signs of moisture, drips, or rust. Early detection can prevent significant damage.
Advanced Maintenance Considerations
Beyond the basics, there are advanced maintenance considerations that can further enhance your water heater’s efficiency, performance, and lifespan, ensuring it operates at its best year after year.
- Insulating Older Water Heater Tanks and Pipes: This can significantly reduce heat loss and save energy. Insulation jackets for tanks and foam tubing for pipes are inexpensive and effective.
- Considerations for Tankless Water Heaters: Besides descaling, ensure air filters are clean and check for any error codes that could indicate service needs.
When to Call a Professional
While many maintenance tasks are within the reach of diligent homeowners, certain situations require professional expertise:
- Annual Inspections: Having a professional plumber inspect your water heater can uncover issues you might not detect.
- Complex Repairs: Any work involving gas lines, electrical connections, or the replacement of major components like the heating element or gas burner should be handled by a licensed professional.
- Installation and Upgrades: Professional installation ensures your unit is set up correctly, adhering to all local codes and manufacturer specifications.
Upgrading or Replacing Your Water Heater
If your water heater is over a decade old, shows signs of significant wear, or requires frequent repairs, it may be time to consider upgrading. Modern water heaters are more energy-efficient and can offer substantial savings over time. Factors like your home’s water demand, energy efficiency goals, and budget will guide your choice.
Conclusion
Regular maintenance of your water heater is not just about preventing breakdowns; it’s about ensuring efficient operation, saving on energy costs, and providing your home with a reliable hot water supply. By following this guide, you can take proactive steps to maintain your water heater’s health and avoid the inconvenience and expense of unexpected failures. Remember, while DIY maintenance can go a long way, don’t hesitate to call in professionals for complex issues or routine inspections to secure your hot water system’s future.
Boosting Curb Appeal: Transformative Tips For A Stunning Exterior 11 Dec 2023, 12:58 pm
Real estate agents often mention curb appeal as a significant selling point for homes. The external appearance of your home can also bring you pride as a homeowner. Whether or not there’s a “for sale” sign in your front yard, these exterior improvements will boost your home’s curb appeal.

What Is Curb Appeal?
The term “curb appeal” is often tossed around among real estate agents and homeowners. Understanding what the term means can help you make the right upgrades.
Curb appeal is the phrase describing how your home’s exterior looks. It includes the landscaping, architectural features, maintenance and decorations that make your home attractive from the outside.
Curb Appeal and Home Value
Boosting your home’s curb appeal can do more than attract the eyes of passersby. It can drastically increase the home’s value. According to a 2020 study, curb appeal can increase a home’s selling price by up to 7%. It may also include upgrades that help homeowners save on power bills and home maintenance costs.
Tips for Improving Your Home’s Curb Appeal
You can improve your home’s curb appeal in numerous ways. Some tasks cost next to nothing and take mere minutes to complete, while others are more expensive upgrades or additions. However you decide to improve your home’s exterior, it’s almost guaranteed to increase the home’s value and your sense of pride.
Mow the Lawn Regularly
Maintaining an attractive front lawn is one of the most effective ways to improve curb appeal on a budget. Mow regularly and edge along the driveway and sidewalks to keep your lawn well-manicured. Weeding and fertilizing your grass will ensure it appears green and healthy.
Upgrade Windows and Doors
Some improvements to your home’s curb appeal cost more than others, however, they’re the ones that can drastically improve your home’s value while helping you save on monthly bills. Scratched, worn-out windows and doors make the home look shabby and serve as a reflection of the interior.
New, stylish doors and windows can have the exact opposite effect, increasing the home’s value and reflecting a well-kept interior. Quality Marvin windows replacement offers superior insulation to old, outdated ones, saving you electricity and money. This upgrade pays for itself over time.
Paint Your Front Door
A fresh coat of paint can do wonders for your front door’s appearance. The front door is also a place where you can have fun with color. Bold hues are welcoming, while black doors tend to fetch more money among buyers.
Decorate With Plants
Redoing your entire front yard landscaping can be expensive. Potted plants are a more cost-effective way to boost your curb appeal with natural greenery. Place potted plants on your porch or on each side of your front door to create a fun and attractive look. You’ll probably find yourself enjoying the process of changing your plants or flowers with the seasons.
Keep Porch Furniture Fresh
Outdoor furniture undergoes a lot of wear and tear. The paint on porch chairs and tables will chip and become worn more quickly than your interior furniture.
Check your porch furniture often and freshen it up when it gets dirty or scratched. Maintaining porch furniture can be as easy as removing cobwebs, cleaning or giving it a fresh coat of stain. Always repair or remove furniture that’s falling apart or unsafe for use.
Put Unsightly Objects Away
Upgrading curb appeal can be as easy as keeping the exterior neat and tidy. This means putting all toys and garden equipment away after use. Coil your garden hose neatly alongside the house or out of view.
Trash cans are heavily used objects that often need to remain outdoors. Buy or build a trash can cover alongside your home to remove trash cans from view. Behind the cover can also be a convenient place to keep heavily used garden items.
Improving a home’s curb appeal involves keeping the exterior neat, tidy and updated. It can be as essential as replacing your home’s windows and doors or as simple as committing to regular yard work. Whichever methods you choose, you and your neighbors are guaranteed to notice the positive effects of an attractive home exterior.
Author bio: Mauricio Jaimes is CEO of Davis Window and Door — a one-stop solution for the perfect replacement, remodeling and new construction of windows and doors.
6 Tips For Removing Stains From Furniture 9 Dec 2023, 1:42 pm
Spills and stains on furniture are inevitable. Even the most careful individuals may spill a drop of nail polish or accidentally rub dirty feet on the couch. Spills and stains can be even more challenging to control if you have pets or kids in your home.
Fortunately, these mistakes don’t have to cause permanent damage to your furniture. The following are some of our top tips for cleaning your furniture and keeping it looking new.
Follow Instructions
The No. 1 way to clean your furniture is according to the label. Experts always suggest keeping the tags on your furniture or designating a place in your home for them. Many furniture pieces are made from specialty fabrics or fabric blends that require special care. Saving the tags ensures you understand what those fabrics are and the best methods for cleaning them.
Many furniture tags include fabric cleaning codes. Understanding these codes will help you clean your furniture correctly by removing stains without causing additional damage.
Common fabric cleaning codes include:
W – Water-based cleaners and fabric steamers are safe for use.
S – Spot clean or dry clean the fabric. Use only a fabric-safe solvent.
S/W – Water- and solvent-based cleaners are safe for spot treating.
WASH – The fabric is removable, and you can wash it in the washing machine with cold water on a delicate setting. Tumble dry on low heat or air dry.
X – Do not use any cleaners or solvents on this material. A vacuum cleaner is the only option.
Don’t Let Spills Sit
The most effective time to clean a spill is right away. The longer a stain sits on your furniture fabric, the more likely it is to become permanent.
Vacuum Regularly
The best way to eliminate stains is to prevent them entirely. Vacuum your furniture regularly to remove dirt, pet dander and dust particles that can settle and cause stains over time.
Avoid Harsh Chemicals When Possible
Specialty cleaners with harsh chemicals can cause more damage than they remove. They can be toxic and too harsh, ruining some furniture upholstery permanently. White vinegar and baking soda are natural cleaning solutions that are safer for many fabrics.
Dab, Then Dry
The key to properly removing stains is to go about it gently. You may feel frustrated and inclined to vigorously rub the mess out, but that’s not the most effective way. Instead, sop up any liquid with a clean towel, gently blotting the area. Rough, rubbing motions will push the stain deeper into the upholstery, making it significantly harder to remove.
Vacuum the stained area when finished dabbing to remove any excess grime. Completely drying the area is an essential part of the cleaning process. This may require the use of fans or limited time in the sun.
Protect Your Furniture From Fading
Remember that UV rays can fade color and deteriorate fabric over time. Use a UV-resistant cloth or spray on outdoor furniture or pieces that sit in direct sunlight. If drying your furniture in the sun, remove it as soon as it’s dry.
Shop for Furniture Wisely
Entering living room and dining room furniture stores can be overwhelming. You’ll see countless styles of furniture upholstered in a wide range of fabrics. Enlist the help of the salespeople on site when choosing the most ideal upholstered furniture for your dining room or other space.
Do you live in a home with kids and pets? Experts may recommend dark colors, bold designs or stain-resistant upholstery. Choosing fabrics that camouflage or repel stains from the get-go can relieve a lot of the stress associated with stains and damage. Unfortunately, this may mean skipping certain colors or sensitive fabrics you find attractive.
Quality furniture is a significant investment. It’s no surprise that spills and stains can cause frustration. Remember that most stains are treatable, and with the right cleaning and prevention methods, your furniture can look like new for years to come.
Author bio: Troy Simmons is General Manager at Bel Furniture, a leading furniture and mattress retailer. Simmons is a local Texan who has over 20 years of experience in the furniture business.
Relocating Your Family? What To Consider 3 Nov 2023, 2:33 pm
Making the decision to uproot the family for a move is not an easy one to make. Once it’s been determined, there are still a lot of factors to consider when it comes to ensuring its impact isn’t too great. This is particularly true for families with school-aged children who will be leaving behind friends and likely the only home they’ve ever known.
Although moving can be tough on everyone, the emotional effect it typically has on children can be more significant than you might realize. Because of this, parents need to do all they can to prepare their little ones for the big changes moving can bring to their lives. Below, we’ll go over a few helpful pointers on easing the transition when it’s time to relocate your family.
Infographic provided by Move Central, moving services
Make Communication a Priority
First and foremost, you need to be communicative with the kids. Whether they’re teenagers or toddlers, conveying what to expect along the way is essential because it provides them an opportunity to mentally prepare. Communicating ought to be done in an age-appropriate manner. This could involve reading books written on the subject or utilizing online resources aimed to make starting the conversation easier. Whichever approach you choose, remember to be patient, encourage questions and share the news sooner rather than later.
Be Open and Empathetic
You should also be ready to face some big emotions — not just when breaking the news but throughout the entire process. Each child is different and may react with excitement, anger, sadness or any combination of feelings. Depending on age and temperament, children may even have behavioral problems at school or home. The key is to acknowledge their emotions as well as to address any concerns and fears as they are shared. You also need to stay positive as your children are looking to you for guidance during this brand-new experience.
Do Your Research
Preparing your family means looking ahead. From taking a private tour of the new school and scouting out interesting community offerings to scheduling the right movers for the job, you need to be carefully considering what’s on the horizon. Speaking of movers, it can really pay to have a team of professional movers at your side — especially if your move is taking you across the state or country. Doing so frees you up to take care of your children’s needs and focus more on staying positive, rather than handling all that back-breaking lifting and hauling.
Take Time to Say Goodbye
Another tip parents should definitely consider prior to moving is giving the kids opportunities to get closure. There are plenty of ways to go about it. For instance, you could throw a moving away party and invite their friends. During the event, be sure to take down everyone’s information and give out an email address to help them stay in touch well after the move. Doing so can be very beneficial in maintaining social skills and important relationships down the road.
Bidding farewell could also include dining at a favorite local eatery or stopping by a well-loved park or attraction in the area. Just keep in mind that the goal is to make the hard process of emotionally saying goodbye just a little bit easier. After all, kids often experience a period of grief when moving and said grief may stay with them for a long time. By helping them to get closure, it could work to make the process of settling in less distressing. It may even help get them ready to make friends and happy memories in their new home.
These are just a few pointers to get you started on your upcoming moving adventure. If you would like to learn more about preparing your family for a move, please see the accompanying resource from Move Central for further information.
Author bio: Stan Caramalac is the founder and CEO of Move Central. He started the company because he truly believed that moving could be simple as long as it was done efficiently. He strives to help people make their moves smoother and less stressful. Caramalac and his team proudly serve San Diego, Orange County, Los Angeles and the Bay Area.
9 Tips for Room Sharing Between Siblings 3 Nov 2023, 2:25 pm
Room sharing between siblings is more than a necessity. It can be a truly enriching experience. We’ll look at the various benefits of having siblings share a room and effective ways to mitigate common challenges. You’ll also find our top tips for success when implementing this arrangement. From ensuring they’re sleeping on the best mattresses to carving out personal space in a shared environment, we’ll arm you with the info and knowledge you need to help your kiddos make it work.

What Are the Benefits of Siblings Sharing the Same Bedroom?
Sharing a bedroom with a sibling has several advantages that go beyond simple space-saving. It can be a natural setting for siblings to strengthen their relationship through shared conversations and activities. At the same time, observing each other’s bedtime routines often leads to improved sleep habits for both. The setup is particularly helpful in homes with limited space, as it allows for better use of the available rooms.
Room sharing isn’t just about squeezing two kids into one space — it has tangible benefits for their personal development as well. When siblings share a bedroom, they often have better communication with each other, which fosters emotional bonds. They are more likely to feel secure during bedtime, knowing that someone familiar is nearby. Finally, sharing a room makes it easier to allocate remaining rooms in the house for other purposes, such as creating a guest room or study.
- Sibling Bonding: Sharing a room gives siblings extra time for conversations and activities, fostering a closer relationship.
- Improved Sleep Habits: Observing each other’s bedtime routines often leads to better sleep practices for both siblings.
- Security: Children often feel more secure and fall asleep more easily when they know a sibling is in the same room.
- Efficient Use of Space: This arrangement frees up other rooms for different uses like a study or guest room.
How Can I Get My Kids to Share a Room Peacefully?
Designed right, a shared bedroom can give each child a sense of ownership. Here are our top tips for sharing a room with a sibling and doing it peacefully:
1) Establish a Routine for Bedtime
A consistent bedtime routine helps children wind down and signals it’s time for sleep. The routine creates a predictable environment, making it easier for siblings to adjust to the shared space. Both siblings should participate in setting up the routine to ensure everyone is comfortable with it.
2) Use Staggered Bedtimes
Having siblings go to bed at different times helps minimize disturbances. Usually, the younger child goes to bed first, followed by the older one. This gives each child time to fall asleep without the other causing distractions.
3) Plan a Gradual Transition to a Shared Room
When transitioning siblings to share a room, it’s important to ease them into it. You can start by having the younger sibling nap in the older child’s room. Gradually increase the time spent together in the room before making it a full-time arrangement.
4) Consider Age Appropriateness for Room Sharing
The right age for siblings to share a room depends on the children’s comfort levels and the parents’ judgment. Toddler-aged kids can often share a room with an older sibling, and even a newborn can share space if proper precautions are taken.
5) Minimize Sleep Distractions
Creating a conducive sleep environment is important. A dark, quiet room and the use of white noise can help siblings fall asleep, even if one is still awake. Staggered bedtimes also contribute to minimizing distractions.
6) Manage Nap Times Effectively
Scheduling naps at different times or using white noise can help when siblings share a room. This ensures that one child’s naptime activities don’t interfere with the other’s rest.
7) Create Individual Space in a Shared Room
Even in a shared setting, each child should feel they have their own space. This can be achieved through room dividers like shelves, different colored beddings or letting each child personalize their part of the room.
8) Make the Shared Space Comfortable for Both
Both children should feel at ease in their shared room. Allowing each to have input in decorating creates a space that reflects their individual personalities while promoting a sense of sharing.
9) Consult a Pediatric Sleep Expert
If sleep issues persist despite these strategies, consider seeking the help of a pediatric sleep consultant trained in sleep coaching. They can offer tailored solutions to address specific sleep habits and challenges your children may face.
FAQ on Siblings Sharing Rooms
When is it appropriate for a toddler to share a bedroom with an older sibling?
A toddler can generally move into an older sibling’s room after transitioning from a crib to a twin bed or even a full-size mattress, usually around two to three years old. This makes toddler sleep easier to manage and allows space for each child in the room.
What is the recommended age for room sharing with a newborn and an older child?
Experts suggest waiting until the baby is at least six months old before moving siblings into the same room. This gives enough time to establish stable sleeping patterns and a dependable routine for the baby.
How does sharing a room affect a child’s sleep quality?
When children are sharing a room, it can lead to better sleep habits. The older child’s sleep patterns tend to influence the younger sibling, establishing a consistent routine for both.
What are some common problems when siblings share a room, and how can they be addressed?
Problems may arise for whatever reason, but early intervention can help ensure successful room-sharing. One common issue is the lack of personal space. This can be resolved by allocating a separate space for each child, perhaps using room dividers or bunk beds.
What kind of bed arrangement works best for siblings sharing a room?
The choice can vary, but bunk beds with Nectar mattresses are a popular option. These allow for good use of space, especially if the room is small, and they can provide a comfortable sleep experience.
When should siblings move from sharing a room to having separate rooms?
There’s no definitive age for moving siblings into separate rooms. It largely depends on the children’s comfort and needs. If either sibling expresses a strong desire for personal space or if sleep disruptions become a major issue, it may be time to consider separate rooms.
What are some tips for maintaining personal space when siblings share a room?
To maintain personal space, consider room dividers or allocating different areas of the room for each child’s belongings. You can also allow each child to personalize their separate space, making it feel more like their own.
The Positive Impact of Kids Room Sharing on Family Life
Room sharing between siblings has shown numerous benefits — from fostering stronger emotional bonds to promoting good sleepers. You’ve read about practical strategies for implementing this arrangement successfully, and now it’s time to apply what you’ve learned. Whether your children are sharing a room by choice or out of necessity, you have the tools to make it a positive experience for everyone involved.
Remember, challenges may arise, but they are surmountable with the right approach. Keep in mind that your efforts in making room sharing work smoothly can provide long-term benefits for your children, strengthening their relationships and instilling valuable life skills.
Shades of Elegance: A Window into Stylish Blinds 29 Aug 2023, 5:29 am
As we delve deeper into the realm of stylish blinds, you’ll soon discover that they are far more than mere practicality. They are a testament to the marriage of functionality and aesthetics. They are an integral part of your home’s personality, echoing the spirit of your décor while shaping the ambience of each room. With a plethora of designs, textiles, and colors available, these blinds have the power to dress your windows in a way that truly reflects your unique style and taste.
Imagine, if you will, a warm, inviting living room. The sunlight filters through the slats of your timber blinds, casting playful shadows that dance across the room. It creates an atmosphere of comfort, a space that invites you to relax and unwind after a long day. Or picture a sleek, modern kitchen adorned with minimalist roller blinds, where the crisp, clean lines mirror the streamlined design of the space, enhancing its chic, contemporary appeal.
Now, let’s not forget the functional aspect of stylish blinds. They provide you with complete control over the amount of sunlight that enters your home, protecting your furniture from fading and reducing glare on your screens. More importantly, they provide privacy, shielding your home from prying eyes without compromising on style.
The Art of Stylish Blinds
Stylish blinds are more than just functional window coverings; they are statement pieces that can significantly influence a room’s overall aesthetic. Unlike traditional window coverings, stylish blinds provide a blend of practicality and beauty. They offer control over light and privacy while also serving as a design element. The key is to strike the right balance between aesthetics and functionality.
Types of Stylish Blinds
1. Venetian Blinds
Venetian blinds are timeless classics. They come in various materials and finishes, from wood to metal, offering an array of options to suit diverse interior themes. Their adjustability allows for versatile light control, enhancing the mood of a room.
2. Roman Blinds
For a softer, more homely feel, Roman blinds are an excellent choice. The soft fabric folds create a cozy and warm ambiance. Plus, when drawn up, they form an attractive drapery-like appearance.
3. Roller Blinds
If you favor a sleek and minimalistic design, roller blinds will be your best bet. They are simple yet chic, suitable for any room. Their versatility extends beyond aesthetics, serving as practical light and privacy control solutions.
4. Vertical Blinds
Vertical blinds are ideal for large windows or sliding doors. Their modern design and practicality make them a popular choice for both residential and commercial spaces.
Factors Influencing Stylish Blind Selection
1. Room’s Purpose and Mood
The type of blind you select should match the room’s function and intended mood. For instance, a bedroom may benefit from the warmth of Roman blinds, while a vibrant living room may look best with Venetian blinds.
2. Color and Material Coordination
Your blinds should complement your existing decor and color scheme. The right choice can tie a room together, creating a cohesive look.
3. Privacy and Light Control
Depending on your privacy and light requirements, different blinds will suit your needs. For example, vertical blinds may offer more flexibility for larger windows, while roller blinds provide effective light control.

4. Window Size and Type
Lastly, your window’s shape and size will influence your blind selection. Larger windows may benefit from vertical blinds, while smaller or uniquely shaped windows might look best with custom-fitted blinds.
In essence, stylish blinds are the unsung heroes of interior design. They may not command immediate attention, but their subtle influence in shaping the vibe of your home is undeniable. So, take a moment to appreciate the humble window blind. It’s an accessory that effortlessly straddles the line between practicality and elegance, proving that it’s possible to have the best of both worlds.
In the end, dressing your windows is as much an art as it is a science. So go ahead, let your imagination soar, and transform your home into a haven of stylish comfort with the perfect set of blinds. Remember, your home’s ‘eyes’ deserve nothing less than the finest.
Conclusion
Stylish blinds play a pivotal role in interior design, offering an amalgamation of functionality and aesthetic appeal. With a wide range of options available, you can find blinds to suit your individual taste and needs. So, why not explore the world of stylish blinds and enhance your living spaces with a touch of elegance?
From Venetian to Roman, roller to vertical, stylish blinds offer an array of design possibilities. Their versatility extends beyond mere aesthetics, providing practical solutions for light control, privacy, and even energy efficiency. So, as you ponder over your next interior design project, remember to consider the window into stylish blinds – a world where elegance meets functionality.
The Ultimate Guide to Exceeding Homeowners’ Expectations Before, During, and After Contractors’ Work 26 Aug 2023, 1:21 am

Competition among contractors is getting stiffer year on year. According to data, there’s been an increase of 2.5% in construction businesses in the U.S. between 2022 and 2023, bringing the number to 3.78 million.
Therefore, delivering exceptional work that exceeds your client’s expectations is crucial to remaining competitive.
When working with a contractor, homeowners want to work with a business that’s prepared, communicates clearly, has little inventory and supplies overhead, and has a streamlined sales process. This will improve your chances of securing future bids and improve your reputation in the industry.
Here’s what you need to do to ensure you deliver the best job for repeat clients.
Why Delivering Above Expectations Is Worth It
Earning the customer’s trust is an uphill battle for most contractors. It requires changing a few things and processes that you use to manage your contractor business daily and teaching your crew how to handle clients and client projects more effectively to improve trust and earn more referrals.
Typically, you’ll want your business and crew to be proactive, maintain open communication lines, and use technology to streamline project management and other processes.
This helps manage the customer’s expectations and earn their trust, making them most likely to refer to your business the next time they or someone they know wants a similar service.
How to Keep a Positive Relationship with Clients
Here’s a look into the specific things you should do to maintain a positive relationship with clients and exceed their expectations before, during, and after a service request.
Lay Down the Expectations
Having clear expectations is the cornerstone of any successful contractor project. The particulars of your arrangement should be well-defined so that you have a common reference point for judging the progress and deliverables of the project.
You should write important logistical details for the project, such as duration, expected hours per week or month, and the final compensation. You also need to provide an accurate estimate considering the desired quality of the project and the available parts, labor, and materials.
Clear expectations will give you a concise goal to work towards and raise your chances of delivering beyond what the customer expected.
Prepare Yourself and Be Punctual
Most homeowners are used to contractors being late to work. Therefore, you have an excellent chance to be different by ensuring your crew is always early and on time. Technology such as field service management software can help you schedule and plan your crew’s routes better, improving punctuality at the job site.
Your crew should also arrive at the job site fully prepared, packing all the tools, equipment, and materials they need to complete the job or deliverable for the day. This can include simple things such as a change of gear kept in the car, where the crew can swap dirty boots for clean ones if they’re coming from another job.
Being punctual and well-prepared shows the client that you’re a professional contractor business that takes its projects seriously.
Work with a Contract
It is crucial that before you start work on the client’s home, you sign a clear and binding contract between your contractor business and the customer. A contract helps keep things documented and clear for both parties, thus playing a crucial role in managing expectations and tracking deliverables.
A contract also helps protect you against overbearing and abrasive customers who can have devastating financial and reputational impacts. It helps you prove that you delivered work as per expectations and agreement and justify why and how much you should have been paid for the project.
Streamline the Sales Process
Streamlining your sales process is crucial in maximizing the value of pre and post-sales calls and delivering the project according to the client’s vision.
Before starting to work on the project, you can have several pre-construction meetings to iron out as many details as possible about the project. If you have a designer or subcontractor, they should also be included in this meeting.
You should avoid overwhelming the customer with too many options and choices in a single meeting. Have your sales process split into several small meetings that go through each part of the project individually and pass the crucial information needed.
This way, you’ll be well aware of the customer’s expectations and work better towards achieving them, with the customer fully aware of what to expect and how to communicate with your in-office team and crew about new changes or the project’s progress.
Maintain Clear Communication
Good communication is crucial to having a good working relationship with clients. Since you’re not usually face-to-face with the client, you can easily lose track of communication and fail to provide updates on the project’s progress, leading to frustrations on the client’s end.
Clear communication also applies to your suppliers. You should consistently monitor inventory movement within your business to ensure your crew is not wasting time waiting for a resource, which will affect the pace of work and deadlines.
Using field service inventory management tools is crucial at this stage to ensure suppliers and your crew are aware of the movement of equipment, tools, and materials and can adjust their schedules and deliverables accordingly.
Be Transparent About Challenges
Challenges are bound to arise when working on projects. The building market is volatile, making flexibility crucial in delivering projects beyond client expectations.
Apart from sourcing inventory, one of the most prevalent challenges for most contractors is fluctuating prices. While estimates will help give the client a rough figure of how much the project will cost them, being transparent about these fluctuations will help prepare them financially for any changes during the project’s execution and adjust their budget accordingly.
You should also be prompt to communicate changes in schedule due to labor challenges, such as securing subcontractors or bad weather, such as storms, that can make your crew unable to access the job site.
Follow Up After the Work
Don’t close the relationship with the client once you’ve completed the project and received payments. Check in a month or so after completion and ask them for a review of your crew’s work. You can also ask for a referral if they know someone interested in your services.
Asking for a review will show that you care about the quality of work your business offers and will boost the client’s loyalty.
Use Technology to Transform Your Contractor Business
Contractor businesses must exceed customer expectations to remain competitive and build strong customer loyalty and referrals. Using technology such as field service management software will help streamline most processes in your business and help you reach these targets.
Author Bio
Garrett Wilson is the President and Co-Founder of FieldBin. FieldBin is a field service management software designed for trade business owners. The software allows professionals in the fields of Plumbing, HVAC, Electricians, Roofing, and Commercial Cleaning to solve their back-office nightmares quickly. Garrett has expertise in Marketing and Project Management, with experience in multiple industries, including cyber security, healthcare, and manufacturing.
Page processed in 1.025 seconds.
Powered by SimplePie 1.3.1, Build 20121030175403. Run the SimplePie Compatibility Test. SimplePie is © 2004–2024, Ryan Parman and Geoffrey Sneddon, and licensed under the BSD License.